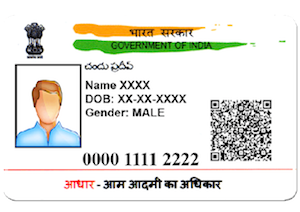
Aadhaar is a 12-digit number provided by UIDAI (Unique Identification Authority of India) to citizens of India. To order to qualify for an Aadhaar number, you have to complete multiple checks and authentications of the data. Such checks will be carried out as you apply for your card.
Applying to Aadhaar is free. Here are the steps you need to take to successfully apply for your 12-digit number and card:
If you apply for a card for yourself or a member of your family, you will need to visit the Aadhaar Enrolment Centre. Enrolment is free of charge. You can get enrolled in every enrolment center near you.
Step 2: Visit the Enrolment Centre with Supporting Documentation
Once you have chosen your enrolment center, you will need to visit the center along with some documents. These are the following:
Identity evidence documents – Voter ID, PAN card, Passport, Driving License etc.
Address evidence documents –Electricity/Water/Gas Bill, PAN Card, Passport, etc.
If you do not have any individual legal document – a family eligibility document containing your particulars (in this case, the head of the household should be registered with Aadhaar).
If you don’t follow any of the above conditions, you may seek the assistance of an introducer at the Enrollment Center who is appointed by the registered and has a valid Aadhaar Number.
Step 3: Enrolling in the Aadhaar
When you visit the center with the necessary documents, here are the measures you need to complete:
Fill up the registration form available at the center with your personal information.
Demographic data collection – The name, DOB, address, gender and mobile number must be given on a compulsory basis. You can also be asked to have your email address, although this is optional.
Biometric detail – Your photograph (only face) will be taken in the middle along with your fingerprints (all 10 fingers) and a scan of your irises.
Children under the age of 5 – the name of the parent / guardian, Aadhaar, and biometrics to be given.
Check all the information received, make any corrections, if necessary, during the evaluation period and full enrolment.
You will receive an acknowledgment slip containing your enrolment number and any information that have been gathered
Step 4: Checking Status of Aadhaar
You can verify the status of your Aadhaar if you have registered with the Enrolment Centre. To check your status, you will need your Enrolment ID or EID. Your EID can be found at the top of the confirmation slip you got after you registered.
The EID is a 28-digit number consisting of two parts:
Format of 14-digit enrolment number 012/01234/012345 and
Format of 14-digit date and time of enrolment dd/mm/yyyy hh:mm:ss
Access the Aadhaar webpage on the UIDAI site to download your copy. You will get your card as a PDF file and it will be password safe.
Your Aadhaar data can be changed, updated and corrected under two categories: Demographics and Biometrics. Demographics include name, address, date of birth, gender, mobile number, and email, while Biometrics includes fingerprints, iris scan, and photograph. Changes to address could be done either online or offline, but changes to any other data can be done only at a permanent enrolment centre. We’ll be talking about address change requests here.
Once you’ve submitted the request for an update, there are two ways to check whether those changes have been updated in the database or not. You could either conveniently track the request online or call the UIDAI toll free number for offline status tracking.
Status checks of Aadhaar address updates can be done online in 4 ways:
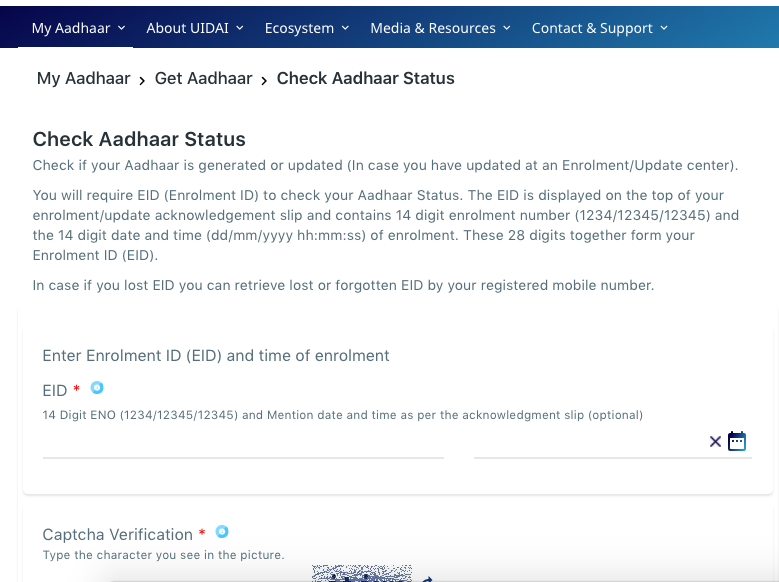
1. Check Aadhaar Status Online Using Your Enrolment ID
If you have submitted an update request at an Enrolment Centre or Update Centre, then you will need your Enrolment ID (or EID) totrack your Aadhaar card status.
EID consists of 28 digits: 14-digit is your enrolment number, and the other 14-digit contains the date & time stamp. It is located on top of the update acknowledgement slip issued to you by the Enrolment or Update Centre after you have submitted your request for a change in Aadhaar details. It may look something like this: 1234/12345/12345 dd/mm/yyyy hh:mm:ss
Once you find your update acknowledgement slip and the EID, these steps are to be followed:
Step 2: Enter the EID and go through captcha/security verification.
Step 3: If your Aadhaar is updated and ready, you will get a status message on the next screen, saying “Your Aadhaar is generated”. You can download or get Aadhaar on your mobile from this screen itself.
Step 4: If the database hasn't added your requested updates, then you will not get the above message.
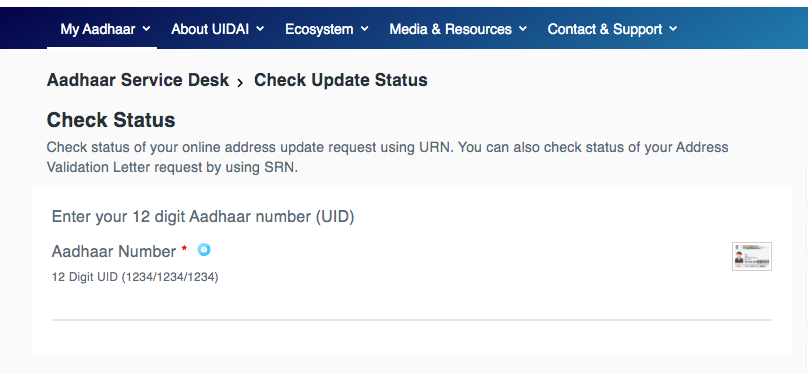
2. Check Update Status Online Using Aadhaar Number
If you have submitted an address update request online with UIDAI, then you can track it using your Aadhaar number (or UID number – Unique Identity number) itself.
Step 2: In the space provided there, input the 12-digit number found on your UID card.
Step 3: Go through the Captcha verification.
Step 4: The next screen will mention whether the change has been updated in the database or not.
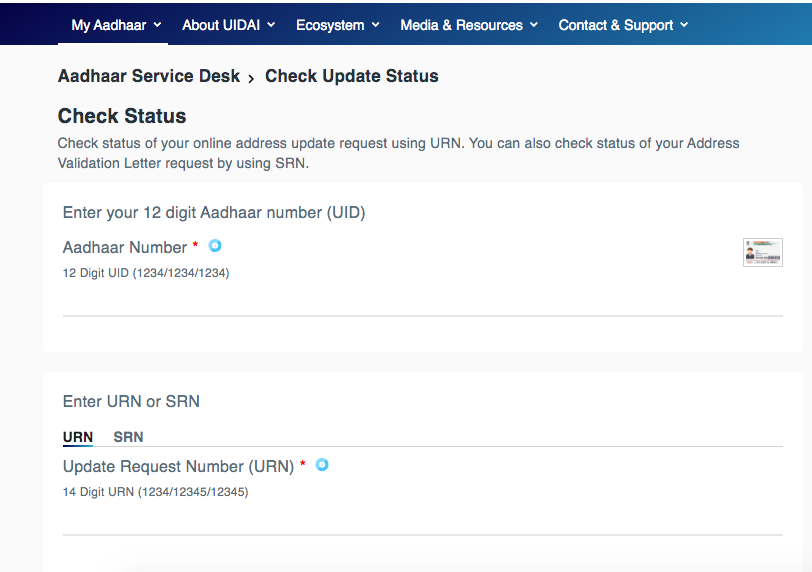
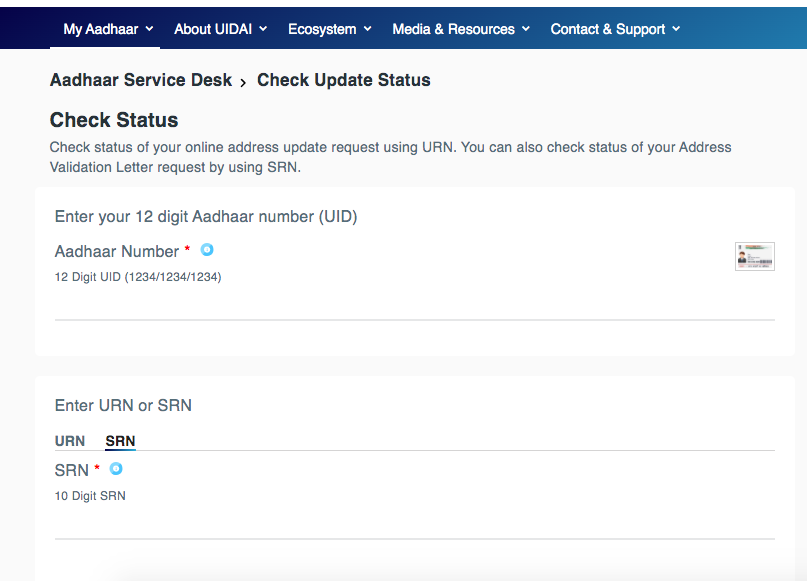
3. Track Aadhaar Update Status Using URN
URN stands for Update Request Number, which is a 14-digit number generated after you complete the process of online address update. URN number will be displayed on the screen once you submit the update. SMS with the URN will be sent to your linked mobile number. The number will be in this format: 1234/12345/12345
To check Aadhaar change status using URN, do the following steps:
Step 3: The next screen will show you whether the change you requested is updated or not.
4. Track Aadhaar Address Update Status Using SRN
You will receive a Service Request Number (SRN) after you place the request for an Address Validation Letter. The steps to be followed are similar to the one for URN – the only difference is that you’ll input the 10-digit SRN along with the Captcha code on the Aadhaar self-service portal.
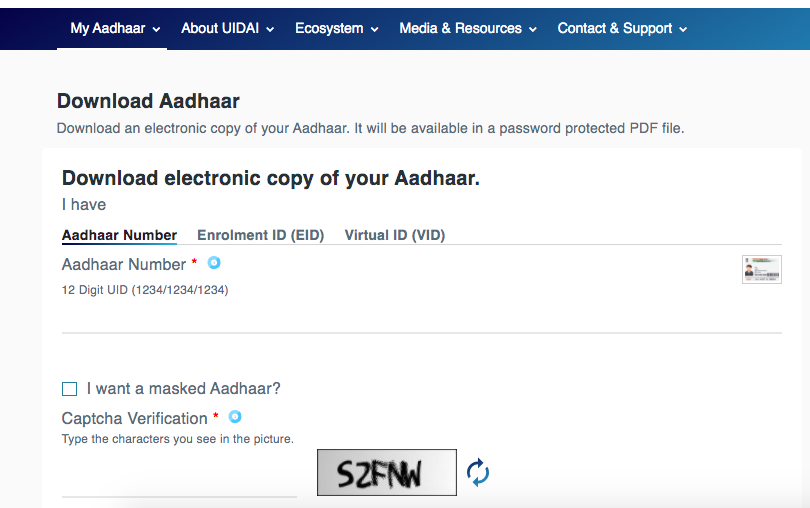
E-aadhaar refers to a downloadable version of your aadhaar card in PDF format; it can be used as a printout for POI and POA.
You will be redirected to a new page in which you can choose the mode of aadhaar card download
Choose the ‘Aadhaar’ option and keep your aadhaar number ready
Enter the required details such as your aadhaar number, full name, pin code of your residential address and then enter the correct captcha image carefully
Select ‘Get One Time Password’ option to get the OTP generated on your registered mobile number
Similarly, if you use mAadhaar app, you have to opt for TOTP
Select ‘Confirm’ to send the OTP
Enter the exact six-digit OTP as per the request
After entering OTP, select ‘Validate and Download’ button to download your e-aadhaar
Enter the password and click on submit
You can now download your e-aadhaar card in a PDF format
Once you get your e-aadhaar card, you can take a print out of this document
This copy of aadhaar card is acceptable as a POI & POA
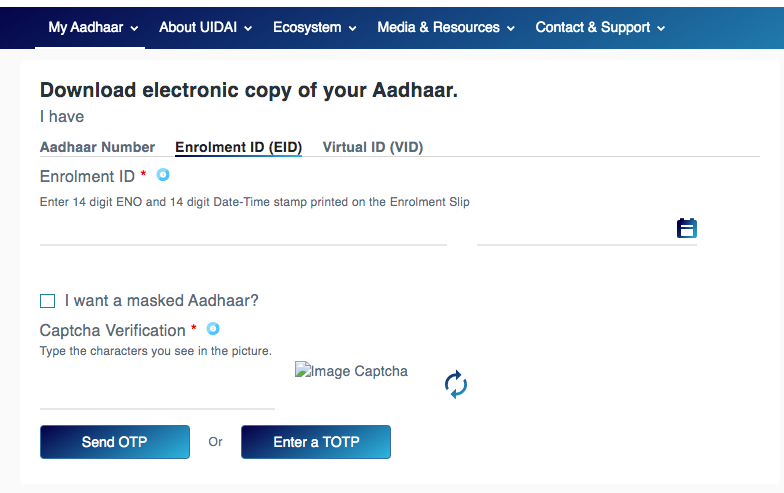
Steps for Downloading E-Aadhaar using Enrolment ID
Aadhar Enrolment Number (EID) can also be used by a citizen to download their e-aadhaar. The EID is mentioned in the acknowledgment slip given to you by the enrolment center post-application.
It will redirect you to a new page where you can select the mode of download
Select the ‘EID’ option and fill your personal details
Enter your 14-digit enrolment ID number and also the 14-digit time and date values
Enter the necessary details such as your full name, pin code of your residential address and carefully enter the correct captcha image
Select ‘Get One Time Password’ option to get the OTP generated to your registered mobile number
Alternatively, you have to opt for TOTP, if you use mAadhaar app
Select ‘Confirm’ to send the OTP
The correct six-digit OTP should be entered as per the request
Select ‘Validate and Download’ button to download your aadhaar card
A PDF file of your e-aadhaar card will be downloaded to your computer
How to Print Your Aadhar card?
As mentioned before, your e-aadhaar gets downloaded in a PDF format. (Adobe Acrobat or any PDF reader can be used for viewing the PDF; you can upload it online as well as read this PDF file). In order to access your card, a password has to be entered; currently, it is a combination of the first four letters of your name and the last four characters of your year of birth and it should be entered in capital letters. Once you have gained access, simply take a print out.
UIDAI has made it easier for people to get their Aadhar card updated or corrected through online and offline. Below are few processes of Aadhar card update or correction through which people can easily get their E-aadhaar card details updated and corrected. You can follow the steps given below to update Aadhar card address, name, date of birth, mobile number and email id either in Aadhaar card online or through offline by visiting the Aadhaar Enrolment/Update Centre.
As per the latest developments, you are allowed to change only your address in your Aadhaar card. In case, you want to update below following details, you have to visit an Aadhaar Enrolment Centre:
Name of the applicant
Date of Birth
Mobile number
Email ID
Gender
Steps for Updating Aadhaar Card by Visiting Enrolment Centre
Details of your Aadhar can be updated by visiting the Aadhaar Seva Kendra. Here is how you can do it easily:
Make sure you enter the information that is correct and not the one that is mentioned in your Aadhaar.
Get self-attested copies of proofs verifying your update request
Submit the form along with necessary documents.
You are required to pay Rs. 25 as a fee for every such visit to the Enrolment Centre either for update or correction.
All your details such as biometric data, image, mobile number, etc. can be updated at the enrolment centre.
How to Update Aadhar Card Details Online
Generally, a person can change address, his/her name, date of birth, gender, mobile number and email id on the Aadhaar card. In order to change the details of your Aadhaar card online, you can follow these steps to update/change/correction
Step 2. If you maintain a valid address proof, click on “Proceed to Update Address”
Step 3. A new window will open, enter your 12-digit Aadhaar number in that and click on “Send OTP” or “Enter a TOTP”
Step 4. An OTP will be generated to the mobile number registered in UIDAI’s database. Step 5. Enter the generated OTP to login to your Aadhaar account. Alternately, you can use the TOTP feature for authentication
Step 6. Select any one option, either the “Update Address by Address Proof” option or the “Update Address via Secret Code” option
Step 7. Enter your residential address mentioned in the Proof of Address (PoA) and select the “Preview” button once done
Step 8. In case you want to modify your address, click the “Modify” option, if not, you can tick the declaration and select the “Submit” button
Step 9. Select the document type which you will be submitting as PoA for verification and then upload the scanned copy of the address proof and click on the “Submit” button
Step 10. Your Aadhaar update request will get accepted and a 14-digit URN will be generated
The Aadhaar enrolment process for children is relatively similar to that of adults, except for certain minor differences. For enrolling children, parents will have to visit the nearest enrolment centre and fill in the enrolment form. The Aadhaar card issued to the child will be free of cost. The only difference here will be that:
In case the child is below 5 years of age, there will be no biometric data captured
A child’s Unique Identification (UID) will be issued by taking into reference the demographic data and photos that are linked to the UID of its parents
Nonetheless, if a child turns 5 years and 15 years, it is required to update his/her demographic data -biometrics of ten fingers, facial photo, and iris scan
If parents are applying for an Aadhaar card for their child who is below the age of 5 years, it is necessary to provide the details of the parent or guardian in the enrolment form
How to apply for a children’s aadhaar card
Visit the nearest enrolment centre and fill up an enrolment form
The parents can submit documents and details to prove the relationship with their child
Parents can review the information, make any necessary corrections and submit the form
Acknowledgement slip along with the enrolment number can be then collected
Below are the steps to apply for Aadhaar to children below 5 years:
Visit a nearby Aadhaar Enrolment Centre. A nearby Enrolment Centre can be located as well.
Mention your Aadhaar number and fill the Aadhaar Enrolment Form
Keep in mind that any one of the parents have to provide Aadhaar details for enrolling children below 5 years
Your child’s photograph will be taken
The address and any other demographic details are filled from the parent’s Aadhaar.
It is mandatory to provide the child's birth certificate
Fingerprints and iris scan will not be done for children below 5 years
The Aadhaar executive will then hand over the acknowledgement slip that contains the enrolment number
The enrolment number can be used for checking the status of Aadhaar generation
Your child’s Aadhaar will be delivered to you within 90 days
How to Apply for Aadhaar to Children above 5 years of Age
Below steps are to be followed for enrolling your child between 5 to 15 years of age for Aadhaar:
Visit the nearest Aadhaar Enrolment Centre to apply for Aadhaar for your child
Fill the Aadhaar Enrolment Form with the necessary details
Mention your Aadhaar number and any other detail in case you do not have a valid address proof of your child.
Submit the form along with your relevant documents to the executive
The executive will then take your child’s biometrics (10 fingerprints, iris scan and photograph)
Once the process is completed, an acknowledgement slip gets generated
The acknowledgement slip contains the enrolment ID in which the enrolment number and time and date of the enrolment will be mentioned
You can use the enrolment ID to check the status of Aadhaar
The Aadhaar card will be sent to the applicant’s address within 90 days of enrolment
Once the child turns 15, he has to get his biometric data updated in UIDAI’s database
One of the problems faced by the citizens is that they are not receiving their Aadhar card. Especially the people who had applied for it during the initial enrolment days are the ones not receiving the card on time. Till date, this problem has not been fixed and the cards being delivered are either wrongly encrypted or have faulty information on them. Before you file a complaint, you must understand that it can take up to 3 months for the card to reach the right person.
In order to find a solution to this problem, you can seek help either from the Government helpline numbers or the portal. Important contact information such as phone helpline and email id is provided below:
Call Center – 1947
Email – help@uidai.gov.in
Know Your UID Number
You can obtain your Aadhar number online or through SMS in case you haven’t received your Aadhaar letter yet. Firstly, you must ensure that your Aadhar has been approved and generated. To confirm this, check the status of your Aadhaar on the Unique Identification Authority of India (UIDAI) website. In order to check the status, you need to know your enrolment ID and date/time of enrolment, both of which can be found on the acknowledgment slip issued to you after submission of documents at the Aadhaar enrolment center.
After your Aadhar is generated, you can get the UID number and Aadhar copy in two ways:
On the UIDAI website, you can generate an e-Aadhar in PDF format. This electronic version is as valid as an Aadhar letter. You could then take a print out of this e-Aadhar as an identity or address proof.
You can also get the Aadhar details on your mobile phone. This option is also made available through the UIDAI website.
Aadhar card Not Received - Download E-Aadhar
An e-Aadhar is nothing but a soft copy of your Aadhar card. It is as valid as the hardcopy and can easily be downloaded from the UIDAI website. Follow the below steps to obtain your e-Aadhar:
Select ‘Download Aadhaar’ from the main page
You will be redirected to the ‘E-Aadhaar’ page
Enter all the necessary information and click on the ‘Download Aadhaar’ link found at the end of the page
If you already know your Aadhar/UID number, you can simply choose ‘Aadhar’ instead of ‘Enrolment ID’ at the top of the form. Your 12-digit Aadhar number can be entered here instead of the 28-digit enrolment details. The rest of the procedure is similar.
Aadhaar on Mobile
To get your Aadhar details on your mobile, you can follow the below procedure:
Select the ‘Get Aadhar Number on Mobile’ link
Enter your 28-digit enrolment details, mobile number and security on the form.
Select ‘Get OTP’. Once you receive the OTP on your registered mobile number, enter the generated OTP in the page that follows.
You will receive your Aadhar details via SMS on your phone after you successfully verify your number through the OTP.
Steps for Locking and Unlocking Aadhar Biometric Data Online
Aadhaar considered as an important unique identification number and the Aadhaar card is used frequently by people as their identity and/or address proof document. Aadhaar contains all your vital information and it is important to keep the information safe. Individuals are required to provide their retinal and fingerprint scan data to the government for obtaining an Aadhar card. This biometric data can be utilised for verification purposes to avail other services.
To Unlock your Biometric Data
Individuals can prevent their Aadhar card being mishandled by simply locking their biometric data stored on the UIDAI servers. Whenever required, the data can be unlocked and used for verification and be locked again. Following is a simple guide for locking your biometric data online:
Visit the UIDAI website and select ‘Aadhaar Lock and Unlock Service’s under ‘My Aadhaar’ and ‘Aadhaar Services’
Select ‘Lock UID’ in order to lock your biometric data
Enter the 12-digit Aadhar Number found on your card.
Enter your Full Name.
Provide your Pin code
Correctly enter the Security Code i.e. captcha as shown on the page
Select ‘Send OTP’ or ‘Enter OTP”
The generated OTP will be sent through SMS to the registered mobile phone number, and the OTP must be entered on the same page itself.
Verify the OTP.
On successful verification, the following message will appear on the screen, "Your Aadhaar number is successfully locked. Use VID for authentication"
To Unlock your Biometric Data
Visit the UIDAI website and select ‘Aadhaar Lock and Unlock Service’s under ‘My Aadhaar’ and ‘Aadhaar Services’
Enter either Aadhaar number (12 digits) or Virtual ID number (16 digits)
Enter Captcha for verification
Select ‘Send OTP’
Enter OTP and select ‘Submit’
Please note that you are required to create a Virtual ID to Lock and/or Unlock biometric data. The virtual ID creation procedure is given below:
Visit the UIDAI website and select ‘Virtual ID (VID) Generator’ under ‘My Aadhaar’ and ‘Aadhaar Services’
Enter your 12 digit Aadhaar number
Enter captcha
Select ‘Send OTP’
Enter ‘OTP’ and click on ‘Submit’
A 16 digit virtual ID will be generated and sent as a text message to your registered mobile number. VID is a random 16 digit temporary, revocable number that is mapped with the Aadhaar number. VID can be used instead of Aadhaar number for e-KYC and authentication. The process of authenticating with VID is identical to the process of authenticating with Aadhaar number. However, the VID cannot be used to derive your Aadhaar number.
If you have missed or misplaced your Aadhaar card, the UIDAI has made it possible for all citizens to receive a duplicate card through a simple process. If you do not know or are unsure of your Aadhaar number, or if you have missed or misplaced your Aadhaar certificate slip, you will still be able to recover your Aadhaar card.
How to get a duplicate Aadhaar card
By following the measures listed below, you can get a duplicate Aadhaar card if you have misplaced your Aadhaar card or if you do not know your Enrolment ID or Aadhaar number.
In the first case, you will be asked to select the right option:
‘You want to collect your lost - Aadhaar Number (UID) or Enrolment Number (EID)
Next please fill in your personal details:
Full Name-Enter your full name in the space provided
Email ID / Mobile Number-Enter your Email ID and Mobile Number (Enter the Email ID or Mobile Number that was issued when applying for the aadhaar card in order to successfully retrieve the card)
Type the 4-digit authentication code displayed on the screen
Press on the OTP button.
You will receive an OTP (One Time Password) on your Email ID or mobile number that you have provided.
Type the OTP in the space given
Press the 'Verify OTP' button
Steps of the offline method to get a duplicate e-Aadhaar card
Alternatively, people can get a duplicate copy of the Aadhaar card offline either by visiting the Aadhaar Enrolment Center or by calling the toll-free number.
Users can call UIDAI toll-free number 1947 and request a duplicate Aadhaar. They need to follow the steps below:
Step 1: Call the UIDAI’s toll-free number 1800-180-1947 or 1947 Step 2: Follow the options for the IVR and take the way of talking to the Aadhaar Executive. Step 3: Request the executive for a duplicate copy of the Aadhaar number. Step 4: The executive will ask you some of the questions to check your identification. Step 5: Once verified, the executive will approve your request and start the process. Step 6: A duplicate Aadhaar card will be sent to the address of the residence by post.
Steps to have a Duplicate Aadhar Card by visiting the Aadhaar Enrolment Centre
If your mobile phone is not registered with UIDAI, you can easily visit the nearest Aadhaar Enrolment Center and request a duplicate Aadhaar. You're going to have to take these moves to get a duplicate of Aadhaar:
Step 1: Go to the nearest Aadhaar Enrolment Center and fill in the Aadhar Correction form.. Step 2: If you know your enrolment number or Aadhaar number, you can request the Registrar to grant a duplicate Aadhaar card. Step 3: Otherwise, the executive will check the biometrics and request for a duplicate of Aadhaar. Step 4: After the successful processing of your request, your Aadhaar will be sent to your home address.
The Unique Identification Authority of India has released an Aadhaar-centric smartphone app called mAadhaar for Android smart devices. The mAadhaar app lets you access all the data of your Aadhaar on your mobile. The app was introduced to help users carry their Aadhaar information in the form of a soft copy instead of holding a physical copy all the time.
The mAdhaar is currently available to all mobile users. If you download the mAadhaar app to your mobile, your Aadhaar profile, which includes your registered phone number, name, address, gender, image, and other information, will be stored in the database. Whenever the service provider demands the specifics of the Aadhaar card, you can access the mAadhaar app and provide the information.
Follow the steps to download the mAadhaar app to your smartphone
Take the following steps to complete the download process:
Step 1: Go to www.play.google.com/store to download the app free of charge.
Step 2: In the search box in the middle of the page, type mAadhaar, and press the search button.
Step 3: Pick the mAadhaar UIDAI app and press the “Install” button to download the app to your smartphone.
Step 4: Once the app has been downloaded on your mobile, open it
Step 5: The page will show the form "Create a password before imported your Aadhaar profile to this mobile app"
Step 6: Type a password.
Steps to connect your Aadhaar number to the mAadhaar app
If you download the app, you should connect the Aadhaar number to the mobile device to access the Aadhaar information on your mobile phone. Follow the procedure you have to complete the link:
Step 1: Open your mAadhaar app and type your password
Step 2: Build your profile by entering your Aadhaar number. Or you can also opt to check the barcode on the Aadhaar card instead of entering the number.
Step 3: When you type the number or scan the barcode, press the “Verify” button at the bottom of the page. For a bit, don't move away from the website
Step 4: If the information provided matches, you will automatically receive an OTP on your registered mobile number.
Step 5: The app is designed in such a way that, after getting the OTP on your registered mobile phone, the OTP is automatically entered into the code and you do not need to type it manually.
Step 6: After entering your OTP, you will be able to see your Aadhaar profile, which includes your name, gender, registered phone number, home address, and other details.
How do view your profile on the mAadhaar app?
Below is a step-by-step guide on how to view your profile:
Step 1: Open the mAdhaar app
Step 2: Type the password correctly
Step 3: Flip through your details once you're on your profile page.
Step 4: If you forget your password, press the "Reset Password" button at the end of the page. Type your new password to unlock your profile
Important things that you know about the mAadhaar app
A mobile phone with a registered SIM should is used to download the app.
There is no facility to enter your OTP, because of security reasons.
You should not switch to other apps while waiting to obtain an OTP.
A user can access up to 3 profiles on a single mobile phone.
Users of the mAadhaar app can share demographic details with their service providers using the QR code.
Users can only use the Aadhaar app on one device
Aadhaar is an inclusive scheme in which all people lawfully living in India have the right to receive the Aadhaar card. The Government is working to supply each and every qualifying citizen with a biometric personalized identity card. But the task is not that easy as not all resident Indians have clear proof of identity and residency. According to the latest details available on the UIDAI website, documentation evidence has been given to 123 Crore individuals. Aadhaar can also be issued citizens who do not have valid record evidence. Read more to find out how to apply for an Aadhaar card without a text.
Steps to Apply without Documentation for Aadhaar Card
If you don't have an Aadhaar card and don't want to apply for it, even if you do not have record proof of identity and residence identification, you can use the aid of an introductory person approved by UIDAI to apply for an Aadhaar card without documents. Follow the measures described below:
Go to the nearest Aadhaar Enrolment Center in your area.
Fill in the Aadhaar Enrolment / Correction Form, defining all data correctly
Have the type validated by an initiator identified and informed by the Registrar or Aadhaar Regional Offices
Submit the form to the executive officer of Aadhaar
Include the biometric data, such as fingerprint, iris scan, and photography
An acknowledgment slip containing the enrolment number is generated that can be used to check the status of the Aadhaar card.
The Aadhaar card will be sent by post to the address shown on the Aadhaar card within 90 days of the Aadhaar enrolment.
Introducers of Aadhaar
The Aadhaar Introducer is a person detected and told either by the Registrar or by the UIDAI Regional Office. The particulars of the Introducer, including its basic information, residential address, and Aadhaar data, are registered in the CIDR (Central Identities Data Repository) of UIDAI.
Eligibility to be an Aadhaar Introducer
An individual can become a UIDAI Introducer if he or she fulfills the following requirements:
He should be at minimum 18 years of age
He is not to have a criminal record.
He has to share his Aadhaar number and information with the UIDAI Registrar
He can be an employee of the Registrar, a trustee of the local body, an elected official of the local body, a postman, a teacher, a doctor, an ASHA worker, etc.
A delegate of a local NGO can also apply to become an initiator of UIDAI.
The Introducer's Responsibility
The Introducer will help the individual to register for the Aadhaar card without documents
The applicant will ensure that the details contained in the applicant's registration form are accurate.
He should be conveniently accessible to residents
In the form, he should check his own data.
The introducer should approve the application if he considers that the information listed in the form to be correct
Only those people who do not have evidence of residency or identity will be introduced
He cannot charge people a fee for introducing them to the Aadhaar Enrolment Centre.
The Registrar may recommend payment for this activity.
Introducer's Liabilities
The role of the initiator is to introduce the individuals to the UIDAI. Its liabilities are laid out below:
He should not conspire to recruit someone who impersonates someone (dead or alive) during enrolment
He should not help someone to take the name of anyone else on deliberately
It should not plan to provide incorrect biometric data to the applicant
Strict action against the introducer will be taken if found to be involved.